
References
- Get started with Azure IoT Hub for .NET, Dominic Betts, 2016-09-12
Pre-Requisites
The following licensed program products serve as the foundation for this introductory tutorial on connecting to the Microsoft Azure IoT Hub with devices:
Some familiarity with Microsoft C# programming language constructs is desirable.
Introduction
This tutorial is a retrace of the excellent example provided by Dominic Betts at the Microsoft Azure site as noted in the reference section above. All credit is due to Dominic for sharing his work in a very informative manner.
The introductory work will emulate the steps published by Dominic using a C# client. A latter article will examine the Python and Node.js interfaces for the equivalent exercises.
Scope
This tutorial covers the following topics:
- Create an IoT hub
- Create a device identity in an IoT hub
- Receive Device Messages at IoT hub
- Create a simulated client
- Exchange data between a device and an IoT
Limitations to Scope
The underlying assumption of this article is that the pre-requisites have been fulfilled prior to proceeding to the next steps. It is beyond the scope of this article to enable the pre-requisites.
Objectives
This tutorial accomplishes the following entry level applications a la “Hello World:”
- CreateDeviceIdentity: to create a device identity to connect the device securely to an IoT hub
- ReadDeviceMessages: to process data from a device to an IoT hub
- SimulateDevice: to send telemetry from a device to an IoT hub
Create an IoT hub
This exercises uses an Azure IoT Hub for the transmission of data from IoT devices. The following steps illustrate the key steps to create a new Microsoft Azure IoT Hub.
- Logon to the Microsoft Azure Portal. You will need to establish an account to proceed with the subsequent steps if you do not have an Microsoft account already.
- On the Microsoft Azure portal page, drill down from the left pane to the right by clicking in the following sequence:

| Figure 1 New IoT Hub |
+ New è Internet of Things è Azure IoT Hub
- On the IoT hub blade:
o Enter the data for the following fields as appropriate:
- Name: must be unique across Azure IoT Hub or else an error message is flagged; a green check mark indicates that your entry is unique
- Pricing and scale tier: choose F1-Free if available
- IoT Hub units: retain the default
- Device-to-cloud partitions: retain the default
- Subscription: hopefully you have enabled a trial subscription for this exercise
- Resource group: select as appropriate (if you have existing Azure resources)
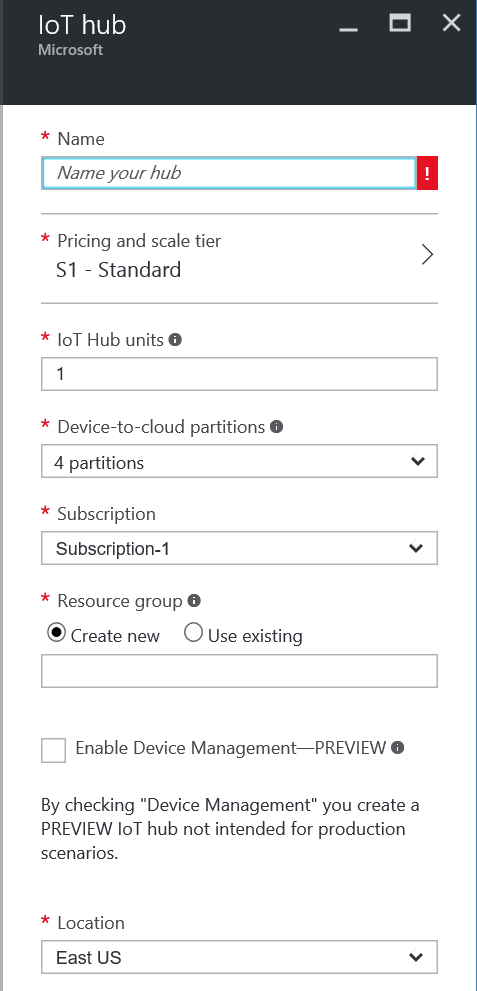
| Figure 2 Create IoT Hub |
Location: your preference should be fine for this exercise
o Click the Create button at the bottom of the blade
It will take a few minutes for the hub to be created. Azure will post a notification when the deployment of the hub is successful.
- On the portal page, click All Resources and then click the Name of the newly deployed IoT hub:
| Figure 3 All Resources |
- Make a note of the fully qualified Hostname as highlighted in the preceding figure under the Essentials group of the blade for the named hub.
- On the blade for the named hub, under General, drill down as follows:
Shared access policies è iothubowner
| Figure 4 Connection String |
On the iobhubowner pane, in Connection string – primary key, copy the string to the clipboard using the icon button adjacent to the right of the field. Paste the Connection string to a document for later use.
The Hostname and Connection string are the two key parameters used by IoT devices to exchange data.
Create a device identity
In order for a device to communicate with the IoT hub, it needs to identify itself uniquely. Azure IoT uses the term device identity for this purpose. There is yet another article by Dominic Betts that explains the background information in greater detail.
A basic Windows console app using the Microsoft Azure IoT Service SDK synthesizes the device identity for use in communications with the Azure IoT hub.
Build Windows Console App
The following steps build a basic Windows Console app:
- Launch Visual Studio 2015
| Figure 5 Launch Visual Studio |
- On the Start Page, drill down to Project:
File è New è Project…
| Figure 6 Start Page |
- On the New Project window:
o Drill down to Console Application:
Installed è Classic Desktop è Console Application
o Enter an appropriate Name for the app
o Click the OK button
| Figure 7 New Project |
| Figure 8 CreateDeviceIdentity Initial Panes |
After the wizard completes its operations, the shell for the main program appears on the left-center pane and the Solution Explorer on the right pane as shown below:
| Figure 9 Manage Nuget Packages |
In the Solution Explorer pane, right-click the CreateDeviceIdentity project and on the context menu click Manage Nuget Packages:
- In the Nuget Package Manager window, enter microsoft.azure.devices in the text box on the upper left and click the Browse button.
- Select Microsoft.Azure.Devices in the results pane and click the Install button on the right pane
| Figure 10 Install Nuget Package |
- In the Review Changes window, click the OK button
| Figure 11 Review Changes |
In the License Acceptance window, click the I Accept button
| Figure 12 I Accept |
| Figure 13 New References |
In the Solution Explorer pane, for the CreateDeviceIdentity project, the References node should have new entries for the Azure libraries
| using Microsoft.Azure.Devices; using Microsoft.Azure.Devices.Common.Exceptions; |
| Figure 14 References to Azure SDK libraries |
In the source code file, Program.cs, insert the references to the newly added libraries with C# language using statements as shown below:
| 1. static RegistryManager registryManager;
static string connectionString = “<your iot hub connection string>”; |
| Figure 15 Program variables |
In the source code file, Program.cs, insert the following statements to define the variables, registryManager and connectionString, for use in registering the device identity:
The connection string value should be the corresponding string for your newly created Azure IoT Hub as shown in Figure 4 Connection String.
- The app requires a nominal set of instructions to create the device identity using a method, AddDeviceAsync, for the class that constitutes the app, Program:
private static async Task AddDeviceAsync()
{
  string deviceId = "raspbarin";
  Device device;
  try
  {
    device = await registryManager.AddDeviceAsync(new Device(deviceId));
  }
  catch (DeviceAlreadyExistsException)
  {
    device = await registryManager.GetDeviceAsync(deviceId);
  }
  Console.WriteLine("Generated device key is {0}", device.Authentication.SymmetricKey.PrimaryKey);
}
|
| Figure 16 AddDeviceAsync Method |
As explained in literature, async methods are now de rigueur for most operations especially when these methods communicate external to client environment. Also, for illustration purposes, a set of instructions for exception handling, used for simple illustration here, represent good practice towards the stepwise refinement of the solution for more robust operations.
The variable, deviceId, should be any identifier unique to the device. This example uses the host name of the client machine as the device identifier.
- The last step for the code is to insert the instructions to connect to the Azure service, retrieve
| 1. registryManager = RegistryManager.CreateFromConnectionString(connectionString);
2. AddDeviceAsync().Wait(); Console.ReadLine(); |
| Figure 17 Retrieving Device Identity |
the assigned identity and echo it to the terminal window:
The final program should be similar to that shown below:
| Figure 18 Full Program |
- Use the Debug mode to run the app: press the F5 key (or drill down)
The output from the program to the console is shown below:
Figure 19 Console Terminal Window
- The console terminal window will display the device identity key. Save this key for use in subsequent message exchanges between the device (client machine) and the specific IoT hub that was created previously for this exercise.
LThe device key for raspbarin is G2r4dKhry0Xfy0gC7FEUMlbUciETVCFqtHqhbPMdryg=
Receive Device Messages
This project will use a basic Windows console app to read messages from a device client to an Azure IoT hub that was created using steps outlined earlier in this article.
Figure 20 Device to Cloud Messaging
Build the console app
The steps to build the console app are shown below. For this exercise, the corresponding project is added to the solution.
| Figure 21 Add New Project |
In the Solution Explorer pane, right-click the solution name and drill-down to Add è New
Project:
| Figure 22 Add New Project |
In the Add New Project window, enter the Name for the project (e.g. ReadMessages)
- In the Solution Explorer pane, right-click the name of the newly created project and from the context menu select Manage Nuget Packages
- In the NuGet Package Manager window, enter WindowsAzure.ServiceBus in the search field click Browse
- In the results frame, select WindowsAzure.ServiceBus and click the Install button
| Figure 23 Install Windows Azure Service Bus Package |
In the Preview window, review the package name and click the OK button
| Figure 24 Review Changes |
| Figure 25 Added Reference |
In the License Acceptance window, click the I Accept button. The figure below illustrates the
added reference:
| using Microsoft.ServiceBus.Messaging; using System.Threading; |
| Figure 26 Using Statements |
In the Program.cs file, add the following two statements towards the top of the file:
| static string myConnection = “<use IoT Hub connection string>”; static string device2cloudEndpoint = “messages/events”; static EventHubClient myEventHubClient; |
| Figure 27 Class Fields |
In the Program class, add three fields as shown below:
| private static async Task ReceiveMessagesFromDeviceAsync(string partition, CancellationToken ct) {
var myEventHubReceiver = myEventHubClient.GetDefaultConsumerGroup().CreateReceiver(partition, DateTime.UtcNow); while (true) { if (ct.IsCancellationRequested) break; EventData myEventData = await myEventHubReceiver.ReceiveAsync(); if (myEventData == null) continue;
string data = Encoding.UTF8.GetString(myEventData.GetBytes()); Console.WriteLine(“Message received. Partition: {0} Data: ‘{1}'”, partition, data); } } |
| Figure 28 Method to Receive Messages |
In the Program class, add a method, ReceiveMessagesFromClientAsync, as shown below:
- In the Program class under the Main method, insert the lines of code shown below:
| Console.WriteLine(“Receive messages. Ctrl-C to exit.\n”);
myEventHubClient = EventHubClient.CreateFromConnectionString(connectionString, device2cloudEndpoint);
var d2cPartitions = myEventHubClient.GetRuntimeInformation().PartitionIds;
CancellationTokenSource cts = new CancellationTokenSource();
System.Console.CancelKeyPress += (s, e) => { e.Cancel = true; cts.Cancel(); Console.WriteLine(“Exiting…”); };
var tasks = new List<Task>(); foreach (string partition in d2cPartitions) { tasks.Add(ReceiveMessagesFromDeviceAsync(partition, cts.Token)); } Task.WaitAll(tasks.ToArray()); |
| Figure 29 Receive Message Operations |
Create a simulated client
For the limited purposes of this exercise, using a simulated client to send messages to the IoT hub in the cloud is more expedient than configuring any IoT device. Opinions will differ on this rationalization. Examples of practical IoT devices (Raspberry Pi, Intel Edison, Freescale/NXP/Qualcomm et al.) are planned for later exercises.
Build the app
- In Solution Explorer, right-click the current solution name and drill-down the context menus to add a new project:
New Project è Add
| Figure 30 Add New Project for Simulated Client |
In the Add New Project window:
o Drill-down the left pane: Installed è Visual C# è Windows è Classic Desktop
o In the middle pane, select Console Application
o Enter a Name for the project
o Click the OK button
| Figure 31 Project Name for Simulated Client |
- In Solution Explorer, right-click the name of the newly created project (i.e. SimulatedClient in
| Figure 32 Manage NuGet Packages for Simulated Client |
this example) and from the ensuing context menu, click Manage NuGet Packages:
- In the NuGet Package Manager window:
o Enter a search string, e.g. Device SDK Azure IoT
o Click the Browse button
o Select Microsoft.Azure.Devices.Client in the left pane
o Click the Install button
| Figure 33 Install NuGet Package for Simulated Client |
- In the Preview window, click the OK button
- In the License Acceptance, click the I Accept button
| Figure 34 References Added for Simulated Client Project |
The figure below lists the references added to the project:
- In the file, Program.cs, add references to the packages using the statements shown below:
| Figure 35 Package References for Simulated Client |
| using Microsoft.Azure.Devices.Client; using Newtonsoft.Json; |
- In the Program class, add the following fields using the actual values instead of the placeholder labels identified in the string definitions:
o myDeviceClient
o myIoTHub
o
| static DeviceClient myDeviceClient;
static string myIoTHub = “{placeholder for IoT Hub host name}”; static string myDeviceKey = “{placeholder for device key}”; |
| Figure 36 Add Fields to Program |
myDeviceKey
- In the Program class, add a method, SendFromClientToIoTHub, as shown below:
| private static async void SendFromClientToIoTHubAsync()
{ double avgWindSpeed = 10; // m/s Random rand = new Random();
while (true) { double currentWindSpeed = avgWindSpeed + rand.NextDouble() * 4 – 2;
var telemetryDataPoint = new { deviceId = “raspbari9”, windSpeed = currentWindSpeed }; var messageString = JsonConvert.SerializeObject(telemetryDataPoint); var message = new Message(Encoding.ASCII.GetBytes(messageString));
await deviceClient.SendEventAsync(message); Console.WriteLine(“{0} > Sending message: {1}”, DateTime.Now, messageString);
Task.Delay(1000).Wait(); } } |
| Figure 38 Method for Simulated Client |
| Console.WriteLine(“Simulated client\n”);
myDeviceClient = DeviceClient.Create(myIoTHub, new DeviceAuthenticationWithRegistrySymmetricKey(“raspbari9”, myDeviceKey));
SendFromClientToIoTHubAsync(); Console.ReadLine(); |
| Figure 37 Send Message from Client to IoT Hub |
In the Program class, add the instructions to send the messages from the client to the IoT Hub:
- Close the solution to save all the files that were modified.
The Create method for DeviceClient uses the AMQP protocol which is popular for IoT devices. There are other protocols (e.g. HTTP) for data exchanges with the IoT Hub. The corresponding packages for these protocols are available through NuGet.
For real-world scenarios, more robust messaging may be necessary. The Microsoft Patterns and Practices team provides examples as well as guidelines on Transient Fault Handling to retry when transmission errors arise.
Build the applications
This example build a solution file with three projects:
- Create device identity
- Send messages to hub
- Read Messages at hub
The first project is run only once to obtain the identity key. The other two projects can be run concurrently to demonstrate the transmission from the client and the processing at the hub.
Startup Projects
The two projects that must run concurrently in the current example are:
- ReadMessages
- SimulatedClient
| Figure 39 Current Solution |
Visual Studio 2015 permits both projects to start-up concurrently.
- In the Solution Explorer pane, right-click the solution name and from the context menu select
| Figure 40 Set StartUp Projects |
Set StartUp Projects:
- In the Solution Property Pages window:
o In the left pane, select Startup Project
o In the middle pane, select Multiple startup projects
o For the project ReadMessages, select the Action as Start
o For the project SimulatedClient, select the Action as Start
o Click the OK button
Run the projects
- On the menu bar, click Debug and on the cascade menu click Start Debugging. Alternatively, press the F5 key:
| Figure 41 Start Debugging |
Two console terminal windows will launch as shown below with transactions logged based on the interval specified in the client app:
| Figure 42 Sending and Receiving Messages |
To stop the projects, click the Stop Debugging button. Alternatively, press [Shift+F5] keys:
| Figure 43 Stop Debugging |
Conclusion
This article illustrated the basic “Hello IoT World” exercise. Subsequent articles will extend the solution with some of the more popular boards and sensors.
